.jpeg)


With constant advances in technology, looking for the best audio interface can feel like aiming for a moving target. Interfaces all share a central task—converting audio between analog and digital formats—but there are important differences. They vary in form factor, processing, inputs and outputs, software, price, compatibility and more.
Desktop models let singer-songwriters, electronic producers, multi-instrumentalists, rappers, content creators and recording enthusiasts of all stripes lay down tracks in their bedrooms at very low cost. Portable interfaces are great for sliding into a bag on the way to a studio session, podcast recording or live show. And thanks to recent advancements, consumers can get capabilities previously available only to recording professionals.
All these audio interfaces can seem like a lot to keep straight. But look on the bright side: Diversity means that no matter your needs, there is an interface tailored perfectly for you. We’re here to help you find it. This guide is your one-stop shop to how these devices work, what you can do with them and what all those specs really mean.
Table of Contents
Why Do I Need an Audio Interface?
How Do I Find the Best Audio Interface for Me?
The Essential Components of an Audio Interface
Additional Resources
Why Do I Need an Audio Interface?
If you have an analog sound you want to record on your computer, you’re going to need a digital audio interface. Some gear will have one built-in (like USB microphones), but the more you record—and as your I/O needs evolve—chances are you’ll want to pick up a dedicated audio interface sooner or later.
Luckily, there are models for musicians and content creators at every budget. Some are perfect for making a demo with one instrument. Others are powerful enough to record an entire band at once—vocals, electric guitars, bass, keyboards, drums, you name it.
DJs need interfaces to record digital and analog gear side-by-side while keeping the levels nice and even. Podcasters use audio interfaces to record dialogue and monitor the sound through studio headphones.
If you record and edit audio, there’s an interface out there with exactly what you need. It all comes down to making sure it has the right components. Once you’re equipped with the knowledge, we’ve consolidated a short list of top picks in our companion piece—“The Best Audio Interfaces of 2025”—to help make your decision even easier.

Shop Now: Focusrite Scarlett 2i2 Gen 4 Audio Interface
How Do I Find the Best Audio Interface for Me?
Start by taking inventory of everything you want to record. Begin with all the audio sources, including vocals, instruments, ambient sounds and whatever else you can see yourself wanting to capture. Then consider how many mics and inputs each of the sources will need.
Are you recording your electric guitar or bass straight into the interface with a Hi-Z instrument input, or are you going to put a mic on the amp? How many mics are you using for drums? Don’t forget synths and drum machines—if you want to record some of these at the same time, look for multiple line inputs.
And then there’s mixing. Do you want to use any pedals or rack gear? Make sure you’ll have enough outs and ins to get them all incorporated into your analog signal path.
Once you’ve got everything listed, determine how many of each input you’ll need to have available simultaneously. That’s your minimum. Depending on how extensive your needs are, you might be able to get an interface that fits all the necessary I/O in one desktop box.
Common questions to ask yourself when choosing an audio interface:
- How many standard (XLR, 1/4") inputs do I need for instruments and microphones?
- How many speaker monitor and headphone outputs do I plan to use?
- How many additional line outputs do I need now or in the future?
- Do I need MIDI or digital I/O now or in the future?
- How compact and portable do I need my interface to be?
Desktop vs. Rackmount Audio Interfaces
Next to consider is where you’ll be doing most of your music making, how much space is at your disposal, and whether you’re setting up a permanent project studio or anticipating some mobility.
Most top-selling audio interfaces are desktop units with one to four input channels, ideal for solo artists, beatmakers and content creators who are typically overdubbing one or two instruments at a time.

Shop Now: Solid State Logic SSL 2+ MKII Audio Interface
Thanks to their relatively compact size, many of these desktop units double as backpack devices you can toss in your bag and take to the session. That’s the beauty of digital recording in today’s age: Artists and engineers can make Platinum records whenever and wherever the creative energy is right.
On the other hand, there are professional rackmount interfaces for project studio practitioners who might already own, or are considering purchasing, said racks and other studio furniture. These can handle many inputs at once, with up to eight simultaneous mic channels and any number of line, instrument, MIDI and digital I/O.
For a more in-depth look at what’s out there, consult our complete guide to best-selling audio interfaces.

Shop Now: Solid State Logic SSL 18 USB-C Audio Interface
Expandability
While you may only need a couple of mic preamps right now, your needs may change in the future. There are ways to leave room to expand.
Remember: Digital connectors, especially ADAT inputs over optical cables, leave tons of room for external mic pres. And for expanding into more diverse sources, there’s always the line in, which can handle any line-level signal you throw at it.
Computer Connectivity
The average home studio interface connects to computers via USB. Smaller units are powered by the port, while larger ones just use it to transfer data. You might see specs like USB 2.0, 3.0 and 3.1—all significant jumps in the maximum data transfer rate. USB became roughly ten times as fast in the switch from 2 to 3, then doubled again for 3.1.
USB connectors also come in multiple shapes, usually the classic rectangular USB-A or the soon-to-be-standard USB-C. These shapes can both technically run at USB 2.0, 3.0 or 3.1 speeds, so make sure to check both the shape and the speed rating.
More advanced, pro-grade interfaces use Thunderbolt, a high-speed data transfer protocol that drastically outperforms good old USB. While it uses a USB-C-type physical connector, it is, in fact, its own beast. To leverage the speed, your computer will also need Thunderbolt-enabled ports.
The Essential Components of an Audio Interface
Analog-to-digital conversion (and vice versa) is a complex undertaking that involves a lot of moving parts, but the right interface streamlines the process, so you don’t have to think about it.
Some users may not even be interested in the finer details, and that’s okay. If you’re a podcaster or a singer-songwriter who plays acoustic guitar, you can grab a simple interface, hook up your gear, open up GarageBand and be good to go without breaking the bank. Seriously, it can be that easy if you want.
But if you’re looking to get the most out of your interface or if you have greater needs, you’ll want to know the components that come into play. That’s why we’re going to break down the essential ones for you.
Microphone Preamps
If you’re planning to record voices or acoustic instruments, you will need at least one microphone input.
A microphone input fits the standard XLR cable used for analog microphones. Most of these inputs will be combo jacks, meaning they also accommodate the 1/4" connections associated with instrument and line-level sources.
Each of these inputs will have a preamplifier, also known as a preamp or pre. Preamps are necessary because the signal from a microphone is weak, so it needs to be boosted to line level before it’s strong enough to record effectively. Preamps will have corresponding gain controls, which can be used to adjust how much the signal is being boosted. So, when we talk about how many preamps an audio interface has, we’re talking about mic inputs.
Another important component of a mic preamp is phantom power. Phantom power is necessary for using condenser microphones, which require up to 48V of power to function properly.
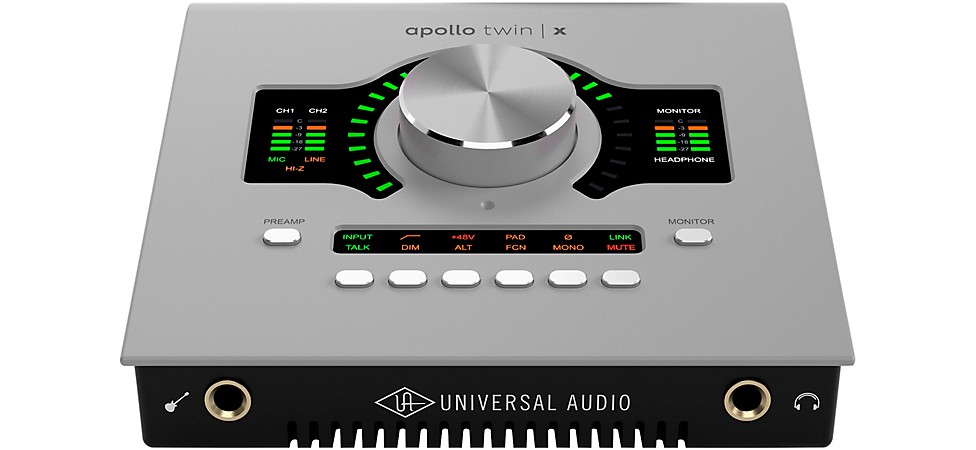
Shop Now: Universal Audio Apollo Twin X DUO Gen 2 Audio Interface
Hot tip: When utilizing phantom power with a condenser microphone, be sure not to turn it on until after you’ve connected your microphone to the preamp.
Also, for more on preamps and how to customize your microphone tone at the source, read up on “How to Build Out a Hardware Vocal Chain.”
Instrument, Line and Digital Inputs
In addition to the mic inputs and preamps, interfaces can have any combination of other I/O, all useful for different purposes. Here’s a quick rundown on each type.
Instrument inputs, also called Hi-Z inputs, are for signals stronger than the ones that come from mics, but weak enough that they still need some boosting. Z stands for ohms, which measure impedance. The most common use for a Hi-Z input is connecting an electric guitar, bass or acoustic-electric directly into the interface.
Line inputs, or line ins, are for signals with voltage high enough that they don’t need extra boosting. If you have an electric guitar already running through a preamp, you can use the line output from the pre to connect it to your audio interface. It’s also the right input for a DJ console or pretty much any gear with a line-level output, including synthesizers and electronic drum kits.
Line ins can help future-proof your rig. If you run out of mic inputs, you can connect an external mic preamp through a line-level connection.
Likewise, line outs can output line-level analog signals at high voltage. If you want to use pedals and rack effects while mixing, these will come in handy. You can output the sound as an analog signal (reconverted from digital), run it through your external processing gear, then send it back to the interface with the line input. You can also use these line outs to connect to powered studio monitors or amplifiers.
The above connectors are analog, but interfaces can have digital inputs and outputs as well. These come in the form of S/PDIF or ADAT connectors.
S/PDIF connections usually run through pairs of RCA-like cables. ADAT connections run through optical cables. The main benefit of digital inputs is they let you expand the total number of audio channels you can record at once.
External mic preamps often have their own analog-to-digital converters, so they can output the digital signal to your interface through these specialized connectors. A S/PDIF input can accommodate up to two more channels, and an ADAT connection can add up to eight—as long as you have the external gear with the proper I/O.

Shop Now: Focusrite Scarlett OctoPre 8-Channel Microphone Preamp
Converters
As with inputs and outputs, you don’t necessarily have to get into the weeds on converters if you don’t want to. Thanks to advances in computer chips, good converters have become more affordable than ever.
However, elite-level converters do make a difference. To see why, we’ll have to talk a bit about how they work. If you're not looking to get into the weeds, skip ahead.
Analog signals look a lot like sound waves, with changes in frequency, wavelength, magnitude, etc. The converter captures an image of the wave over time by taking a series of quick snapshots at high resolution.
The frequency of the snapshots is called the sample rate, and the resolution is the bit depth. In the early days of digital recording, 16-bit was the standard resolution, and 24-bit was high definition. At 24-bit resolution, the signal-to-noise ratio allows a theoretical 144dB of dynamic range with minimal noise. It’s rare to find deeper resolution than this, because the hardware usually won’t have any use for all that extra headroom.
The bigger leaps have come from sample rate. Early converter design operated under the Nyquist theorem. Roughly put, the Nyquist theorem states you could get a perfect reconstruction of the sound wave if you took samples at twice the highest frequency humans can hear.
So, early converters sampled at 44.1kHz, theoretically more than double what our ears could sense. It was later discovered that using even higher sample rates, called oversampling, could improve the quality of the recording even more. Long story short, converters started sampling at a higher rate of 48kHz, with elite interfaces running at 96kHz or 192kHz. Flash forward to today, and even affordable desktop interfaces like the PreSonus Quantum ES 2, Focusrite Scarlett 2i2, and the Universal Audio Volt 2 can operate at 192kHz.

Shop Now: PreSonus Quantum ES 2 USB-C Audio Interface
However, conversion doesn’t begin and end with sample rate and bit depth. Converter design is complex. As you spend more and start looking at higher-end brands, you’ll find even better-quality converters that, due to their superior designs, will sample your audio even more accurately.
In addition to analog-to-digital conversion, audio converters also do the reverse. Digital-to-analog conversion is especially important while mixing for two reasons: (1) you’ll need to monitor the audio while editing it, and (2) you might need to run the signal through analog processing gear with line outs and ins.
A professional interface makes sure you get high-quality conversion in both directions.
The real-world benefits of top-tier A/D and D/A converters include:
- A lower signal-to-noise ratio to improve dynamic range (less distortion, more clarity)
- More accurate transient reproduction for articulate, “lifelike” sound
- Cleaner, more defined stereo imaging and enhanced overall soundstage
Monitoring
You’ll need to monitor your audio while it’s in the process of being recorded and mixed. That’s why interfaces always have a monitoring output to let you listen to the audio live through headphones or speakers. The better the design of these output stages, the easier it will be to make good decisions while recording and mixing.
While you’re at it, don’t forget actual monitors and headphones. Have a peek at some of our dedicated recording packages, complete with interfaces, monitors and headphones, as well. We’ve taken the liberty of removing the guesswork, so you can hit the ground recording and mixing.
MIDI Connectivity
These days, the majority of new MIDI instruments connect through USB. Controllers, synths and electronic drum kits can record straight to the DAW with no need for an interface.
However, older MIDI instruments may connect with 5-pin DIN connectors. While many audio interfaces have followed the trend away from DIN, ones that have this input will make it easy to incorporate vintage gear into your rig.
Onboard DSP
Another component of some interfaces is digital signal processing (DSP). These built-in processors let you add plug-ins during the recording and mixing stages without taxing your computer’s CPU. If you’ve ever tried to run too many plug-ins on a computer that can’t handle it, you’ll know how helpful this can be.
One of the most well-known examples of DSP in action is the Universal Audio Apollo line. Before Universal Audio Digital (UAD) offered native versions of their plug-ins through Spark, an Apollo interface, with dedicated DSP, was required for entering that software ecosystem. With an Apollo interface now, you can maximize processing efficiency by sharing the load across a combination of native CPU and DSP-powered UAD plug-ins—the hardware also lets you run Unison preamps, which is a nice bonus.
Outside of using proprietary software tied to specific hardware, the average home recordist probably isn’t too concerned with integrating DSP into their system, but it’s certainly worth being aware of. Similar brands with DSP-driven hardware and software include Antelope Audio and Apogee.
Additional Resources
Now that you know all the fundamentals, you can shop for an audio interface with confidence.
Guitar Center’s Riffs blog offers a wealth of information. While you’re searching for an interface, we can also help you start a podcast or fully equip a home studio for the first time.
As always, you can contact Guitar Center by phone (866-498-7882), online or in-store for help finding whatever you need.