.jpeg)


Cables are an integral part of pretty much every musician's life, at least those who play electric music. Even drummers, in these days of electronic kits, have a bag full of 'em. In this article, we're going to dive deep on all varieties of audio cables and explain why there are so many different types, what they're intended for and how to make sure you're getting the right cable—and the best one—for your intended purpose. From analog to digital, balanced and unbalanced, we'll untangle the issues. We'll even talk a little about how to keep your cables from becoming their own tangled ball of confusion.
Cable Types
It's important to understand what the best cable choice for any specific application is, and how to tell similar-looking cables apart, so you don't grab the wrong one. What's the difference between an instrument cable and a speaker cable? A mic cable and a AES3 cable? An S/PDIF coax cable and an RCA/phono cable? These and many others are the ones you're likely to run across. Some cables can serve multiple purposes and some are more specialized.
Why a Cable Isn't Always a Cable
It's important to know what the specific application is going to be for a cable, and what the construction and materials for that type of cable should be. For example, a two-conductor shielded cable with XLR ends could be just an ordinary mic cable, or it could be a cable designed for DMX lighting control or for AES3 digital audio. The first has an impedance between 50 and 75 ohms, but the second two have been designed for a specific impedance of 110 ohms. You can, in an emergency, use the digital cables as a mic cable—but using mic cables for digital signals, especially for longer runs, can cause data dropouts or corruption, and that's never good for the vibe.
Here's the most important example of cables that look the same, but should never (and we do mean, never) be interchanged. There can be no visible difference between a single-conductor shielded instrument cable and a jacketed speaker cable, but swapping one for the other can be a big problem. Without a shield, a speaker cable as an instrument cable is going to be very noisy. Even more critically, no instrument cable is designed to handle the current levels that commonly run between an amplifier and speaker. A regular guitar cable running between your 100W head and 4x12 cabinet is going to begin to overheat and potentially fail fairly quickly, and that could result in extreme damage to your amp. So be prepared—always have spare cables in your studio and in your gig kit.
The key takeaway here should be to label your cables (colored tape at each end is a handy way), and store them separately so you have to work a lot harder to grab the wrong one for a particular job.
The Connector Guide
In this next section, we're going to look at the different connectors you'll encounter on common audio cables and provide an overview of the applications for which they're intended. But first, let's look at the question of balanced vs. unbalanced audio cables and why you should care.
A Quick Explanation of Balanced and Unbalanced Audio
At this point in your musical journey, you have probably heard the terms “balanced audio” and “unbalanced audio” multiple times, and heard that balanced audio is considered "better." But you may not have gotten an explanation of either what it's better for, or why it's better to begin with. It really all comes down to the kind of noise you don't want in your music (and if you want to know more on that subject, we suggest our Gear Tip on dealing with cable noise).
Let's look at two cables. First, a standard unbalanced instrument cable that you would use to connect your guitar to an amp. It has a stranded wire center conductor in the middle, inside an insulating jacket. This central wire is surrounded by some short of shield, either braided wire or a layer of conductive foil with a single, naked wire running along with the foil. The center wire acts as the hot or + (positive) connector, and the shield doubles as both a ground and a neutral or - (negative) connector. The center wire does a fine job of carrying the signal, but, because the shield is trying to serve two functions, it's not at its best when it comes to protecting the circuit from extraneous noise while also carrying one side of the audio signal. This means the cable is susceptible to picking up electro-magnetic interference, like 60Hz hum from power supplies. The wire can even act like an antenna and actively pick up other noises as well.
Our second cable is a balanced microphone cable, which uses a three-pin XLR connector. Instead of a single wire at the center of the cable, it has a pair of wires that are twisted together. These two wires carry all the audio signal, so that the shield layer has nothing to do but insulate those wires from noise. While that certainly improves the situation, it's not the whole trick. A balanced audio circuit isn't just the cable, but the entire circuit design. Here's what's going on with that.
You've probably experienced, or at least heard about, the effect of reversed signal phase on audio. If you haven't, here's a quick summary: If you take a signal and flip that signal upside down, so that the peaks of the signal become troughs and the troughs of the signal become peaks, then feed both signals through the same output device you will hear … nothing. A signal that’s perfectly 180° out of phase with itself will just cancel out. So, a balanced audio circuit is designed to flip one side of the signal by 180° at one end, then flip that side back at the other end, bringing everything back to where it started. Any noise that finds its way into the center pair of wires will be equal on both of those center conductors (this is why they're twisted together—so they're equally exposed to any interference), and flipping back the one side, of the original signal, puts one side of the noise 180° out of phase with the other side of the noise, removing it from the sonic equation.
So, balanced audio is better at rejecting noise, which is one reason that you can run signals for a much greater distance on a balanced cable. Any cable with two center twisted-pair conductors and a shield can be used for a balanced connection. It's the circuit design that actually does the balancing.
Another advantage of balanced mic cables is that they can be used to transmit power to whatever device is connected—usually a microphone—with a feature called phantom power. The power is sent so that the voltage is seen between Pin 1 (Ground/Shield) and Pin 2 (hot, according to the AES standard), and between Pin 1 and Pin 3 (neutral, again according to the AES standard), with no voltage present between Pins 2 and 3.
Understanding Cable Connector Gender
Even though, technically, every type of connector has male and female connectors, usually the cable ends are designed to be male plugs, intended to insert into female jacks. The big exception to this occurs in balanced XLR cables, for which the standard input end is female and the output end is a male connector. In this case, that convention exists so that you can reliably expect proper polarity and continuity to be maintained in the connection, since otherwise Pins 1 and 2 could end up swapped.
Cable gender also comes into play fairly heavily in the world of cable adapters and converters, which we'll come back to a little later.
Why Are Wire Gauges Important?
You'll see speaker cables listed from 18 gauge to 12 gauge, and instrument and mic cables touted with 28-gauge to 22-gauge inner conductors. What's it all mean? Simply put, gauge is the thickness of the interior conductors. The lower the number, the thicker the conductor. The thicker the conductor, the more current it can carry. So, speaker cables need heavier gauges because they have to carry a much higher current. For example, a 1,000W power amplifier driving an 8-ohm speaker is providing a little over 11 amps of current to the speaker, which means that anything lighter than a 14-gauge stranded conductor—which is rated to 15 amps—can overheat, causing a number of problems. Lighter gauges, within reason, are fine for instrument, mic and data cables, but it's always better to have a heavier gauge than you think you need for higher power applications.
An Encyclopedia of Audio Connectors
We're dividing these up into general categories, although some of these connectors, like XLRs and RCA/Phono plugs, can fall into more than one, which we'll note as we go along.
Balanced Analog
Our first group of connectors are the ones most generally used for balanced audio cables. Note that the DB25 connector mentioned in the Digital Connectors section is also used for balanced audio snakes.
XLR
Most familiar to musicians as the ends on microphone cables, XLR connectors come in male and female versions, with the female end being at the signal origin end of the cable, and the male end at the signal destination. Originally known as Cannon plugs—not because of their shape, but because they were invented by James H. Cannon of the Cannon Electric Company—they can have from three to seven pins. The three-pin version is the one found most commonly in the audio world. These connectors were designed to be able to transmit high currents, and are used in many analog and digital applications. These applications include balanced mono signal, single-cable stereo feed, digital control signals and digital audio. The key thing to remember is that cables designed for analog audio use are not reliable for digital audio applications, as cables designed for audio have a lower impedance, generally 50–75 ohms, and a higher capacitance. Digital audio cables are designed for a 110-ohm impedance and lower capacitance. For short runs, you may be okay swapping that mic cable in for a AES3 (formerly known as AES/EBU) digital audio cable, but for longer runs, expect the potential of data dropouts and corruption. An XLR cable looks like this (male end shown on top, female on bottom):
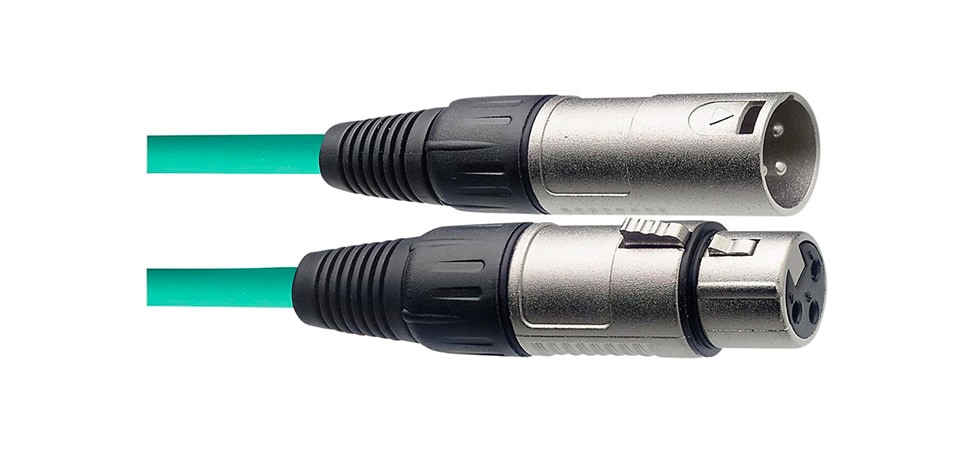
Pictured: Stagg XLR Microphone Cable
An interesting note is that there doesn't seem to be a common agreement on just what XLR stands for. Some say it's “eXtended Line Return.” Some go with “eXtra Low Resistance,” but there seems to be evidence that it originates from Cannon Type X, Latching, Resilient (which refers to the insulation ribs that keep the end from twisting inside the metal shell). The X apparently doesn't stand for anything, but was just Cannon Electric doing some branding. Not that you needed to know that, but we just think stuff like that is fascinating.
TRS
TRS, or Tip, Ring, Sleeve audio connectors come in 1/4" and 1/8" (an approximation of the actual 3.5 mm diameter) versions for professional audio applications. There is also a 2.5 mm "micro" size used for consumer electronics. You'll find cables with these connectors used for unbalanced stereo connections and balanced mono connections, both for longer signal runs and as patch cables in patch bays, as well as for some guitar amp footswitches. Like their cousins, the TS (Tip, Sleeve, about which there's more in the next section), you'll sometimes see these referred to as phone (not phono) plugs, since they started off as the plugs used on old-fashioned telephone switchboards. A TRS cable will look like this for a 1/4":
Pictured: Livewire Advantage Interconnect Cable 1/4" TRS to 1/4" TRS
And this is what 3.5 mm TRS cable looks like:
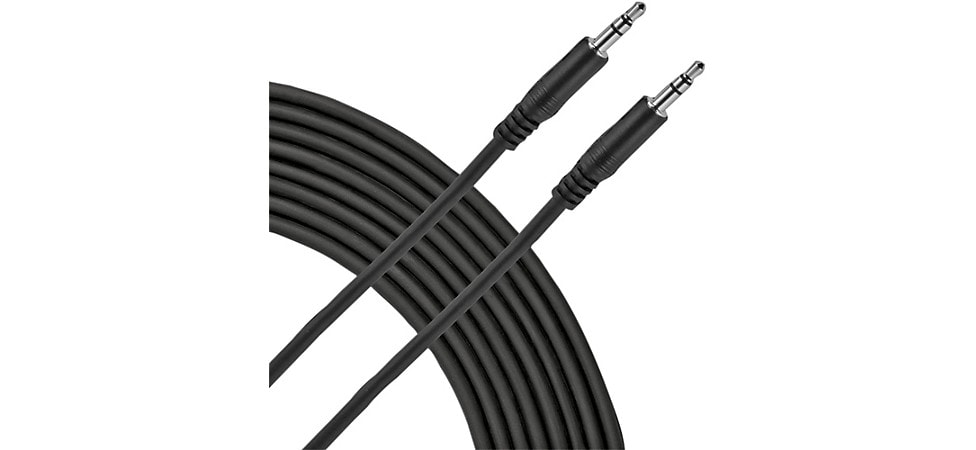
Pictured: Livewire 3.5mm TRS Patch Cable
Most of the time, you can run a TRS cable in place of a TS cable in an emergency, unless you're plugging into something like a stompbox that uses the sleeve connection for switching.
TT
TT, or Tiny Telephone plugs, are miniature versions of the full-size TRS connectors. Cables with these ends are used for high-density patchbays, where you want to maintain a balanced signal path while cramming in as many patch points as possible. TT connectors have a smaller and more rounded tip profile than the mini (3.5 mm) TRS cables, so don't confuse the two. A TT cable looks like this:

Pictured: Rapco Horizon StageMASTER TRS TT Patch Cable 8-Pack
Ethernet
There are an increasing number of devices, like the Catapult-Mini-TX-4-Channel-Cat-5-Audio-Snake.gc that run balanced analog audio over a Cat5e/6/7 cable. These will even carry phantom power if used with the STP (Shielded Twisted Pair) Cat6 cables and one of these devices. An STP Ethernet cable will look like this:
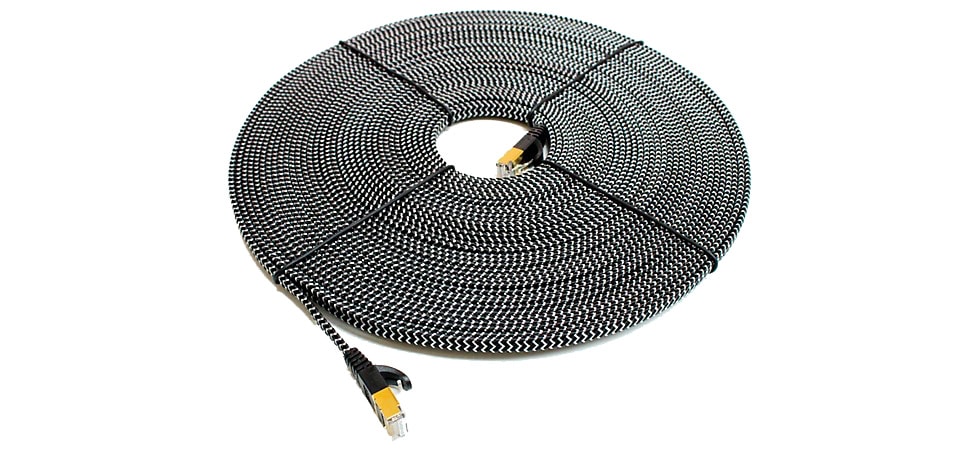
Pictured: Tera Grand CAT7 10 Gigabit Ethernet Ultra Flat Braided Cable
It's a good idea to keep any Ethernet cables you use for audio clearly labeled and separate from any regular networking gear, especially if you're using the shielded ones.
Unbalanced Analog
Here are the connectors used most commonly for unbalanced audio. The last two in the section are only ever used for connecting amplifiers to speakers, so please, don't try them anywhere else.
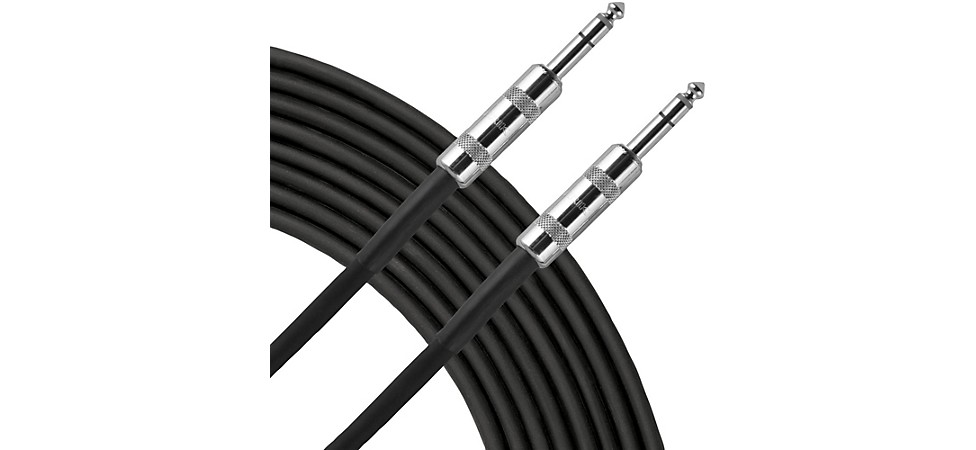
TS
The TS (Tip, Sleeve) plug is probably the most widely known audio connector for the majority of musicians. This is the 1/4" unbalanced connector found on most instrument cables, and on cables for connecting speaker cabinets to guitar and bass amps (though, as we've already mentioned, those two applications require specific cables and aren't interchangeable). It's also used for unbalanced patchbays, and for connecting everything in that totally rad pedalboard you've been thinking about. TS cables look like this:
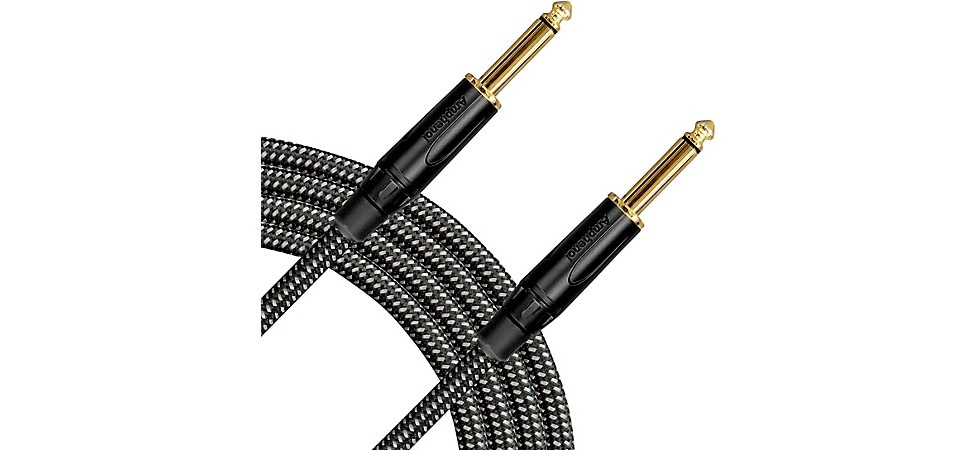
Pictured: Livewire Signature Guitar Cable Straight/Straight
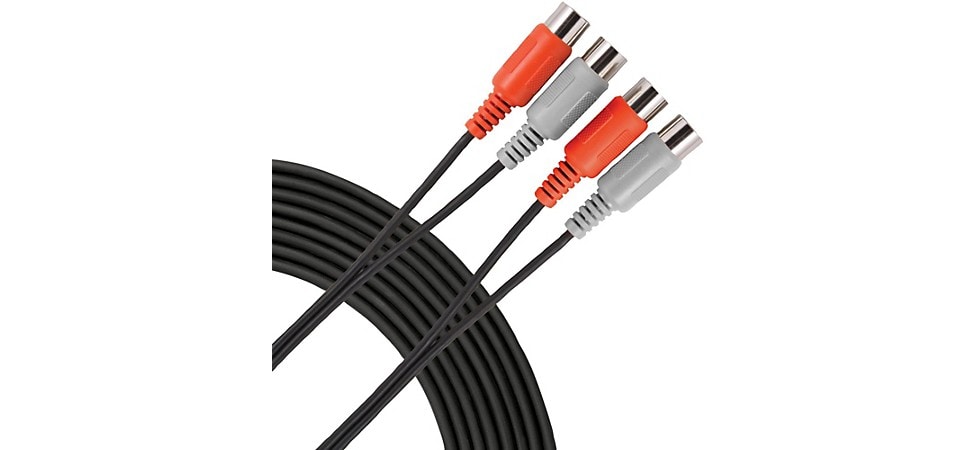
RCA/Phono
Developed by Radio Corporation of America (RCA) in the late 1930s, the RCA plug was originally used for internal connections on radios and phonographs. This last usage was where this simple little connector earned its alternate name—the phono plug (not to be confused with the 1/4" phone plug). These days, in pro audio, you're more likely to find this connector being used for the non-optical version of S/PDIF digital audio. It remains the standard connector for analog vinyl turntables. An RCA/Phono cable looks like this:
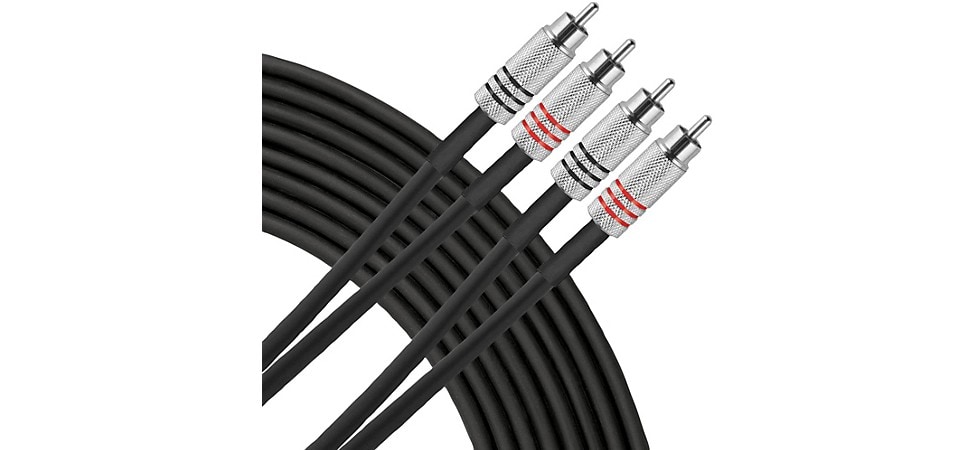
Pictured: Livewire Advantage Interconnect Dual Cable RCA Male to RCA
Speakon
Speakon connectors are a special purpose, high-current connector designed for the demands of high-power amplification. They can handle up to 30A of current, far more than standard 1/4" phone plugs or XLR connectors, and have become the go-to choice for professional passive PA cabinets. Their ability to securely lock when connected is also making them more common on speaker cabinets for guitars, especially tube amps, where an inadvertent disconnection of the speaker load can have disastrous effects on the output transformer and tubes. Similar connectors from other manufacturers are generally referred to as "twist-locking speaker connectors" or something similar. These beefy connectors are available with several connection options—two-pole, four-pole and eight-pole—and feature heavy-duty screw or solder terminals that can handle up to 12-gauge wire. Each pair of poles, labeled + or - and the respective number of the connection, feeds one speaker or frequency range when bi- or tri-amping. Four-pole connectors are the most commonly found. A Speakon-equipped cable looks like this:
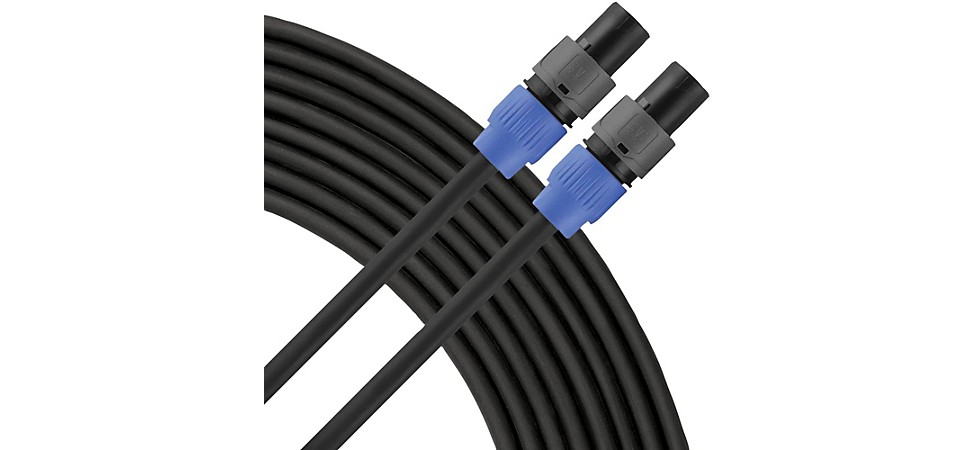
Pictured: Livewire Elite 12g Speaker Cable Speakon to Speakon
Banana Plugs
Invented in 1924, the banana plug is one of the oldest connectors on this list. While it has uses for electronic test probes, in the audio world, the banana plug is almost exclusively used for lower-current speaker and power amp connections in the U.S., but this connector is not used in the EU. Available in single, dual-gang and stacking versions, this spring-loaded, friction-fit connector can still be found on some gear, due to its ease of use and flexibility. Generally, this connector is only used on the amplifier end of a speaker cable, with the other end being either a 1/4" TS or a Speakon connector, depending on the destination. Banana plugs look like this:
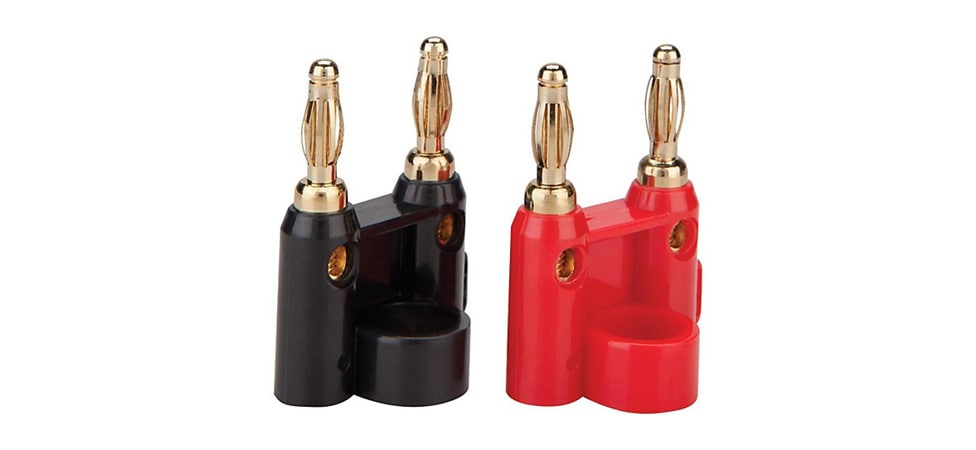
Pictured: Livewire Essential Banana Plug 2 Pack
Digital Connectors
There are a dazzling number of connectors used to encompass the world of digital audio standards. For these, it's important to look at what the manufacturer of the specific piece of gear you're trying to hook up requires, and stick to it.
Lightpipe/TOSLink
While the fiber optic ends themselves are called TOSLink connectors, cables with these connectors are used for two different standards: S/PDIF (Sony/Philips Digital Interchange Format) optical and Lightpipe. S/PDIF, both in coaxial (copper wire) and optical form is a two-channel format, generally used for digital stereo audio, supporting up to 48kHz/24-bit uncompressed audio or compressed surround sound formats. You'll also find S/PDIF, usually in the coaxial format, on some outboard effects units and on high-end preamps and external AD/DA converters, to help keep your signal in the digital world.
Lightpipe, a digital audio standard developed by Alesis for the ADAT 8-track recorder, can carry up to eight channels of 48kHz/24-bit, four channels of 96kHz/24-bit or two channels of 192kHz/24-bit audio, all in uncompressed form. One popular use for Lightpipe is to expand the input count on audio interfaces with external mic preamp units like the Focusrite Scarlett OctoPre (Hitmaker Expansion). A TOSLink optical cable, which can be used for either S/PDIF or Lightpipe, looks like this:
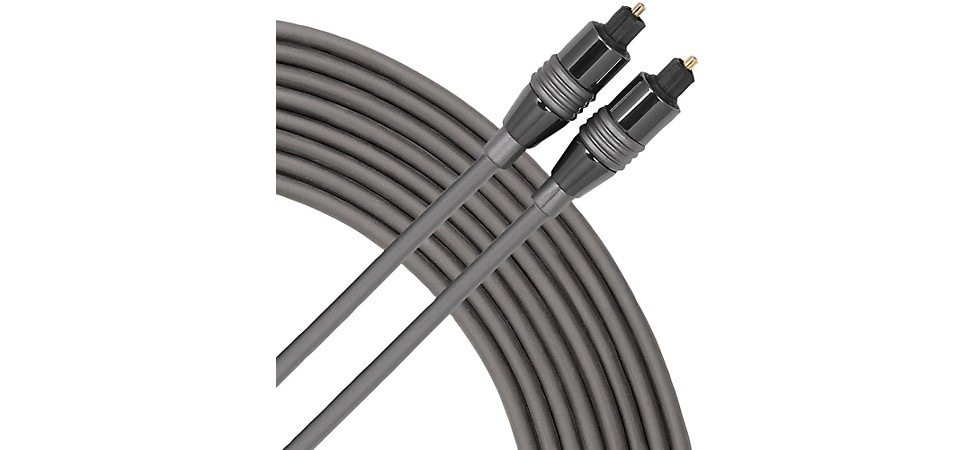
Pictured: Livewire Elite Optical Data Cable Toslink
DB25
Originally intended for a computer's 25-pin serial data interface, the DB25 connector has developed a second life in both analog and digital audio worlds. The principle thing to remember here is that there are three entirely different wiring standards for DB25 cables, so before you invest in one, be sure to check what your gear requires. If it's analog, you're in luck, as there's only a single standard for the 8-channel connector. On the digital side, though, there are two different standards—TASCAM TDIF (shared with Avid Pro Tools) and Yamaha (also used by Mackie and Apogee)—so it's especially important to know before you buy, since there's no visual clue as to which is which; both digital standards will either have a DB25 connector on each end, or a DB25 on one end and four each male and female XLR connectors on the other. A DB25 cable will look like this:
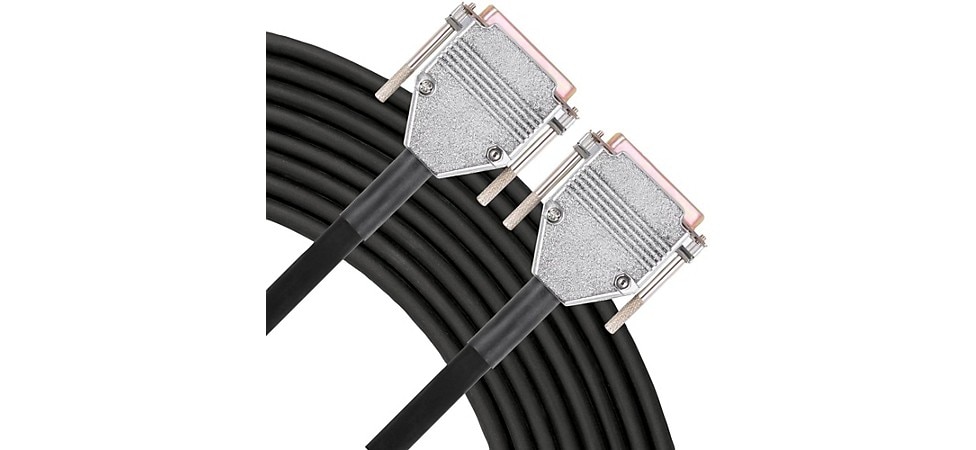
Pictured: Livewire Advantage 8-Channel Snake D-sub to D-sub
AES3
AES3, formerly known as AES/EBU, is more a digital standard, rather than a specific connector. As touched on in the Balanced Analog XLR section above, cables used for digital audio are different from standard mic cables, and using cables designed for analog audio for digital—especially for longer cable runs—can cause data loss or corruption. As we mentioned before, label those cables and store them in separate areas, so you don't grab the wrong one by mistake.
S/PDIF, by the way, is actually a subset of the AES3 standard that tops out at 48kHz/24-bit uncompressed resolution. Just so you know.
Thunderbolt, USB and FireWire
While not audio cables, per se, these three cable types are the standards for connecting audio interfaces to your computer, and external drives to standalone DAW hardware. Standards have changed and evolved over the years, and you'll need a variety of these cables to make sure you can hook everything up. We regularly see systems that use a combination of FireWire 400 and 800, Thunderbolt 2, 3 and 4, and USB 2, 3 and 4 cables. Those last can have USB A, B, C, Mini and Micro ends, so it's no wonder that, over time, we'll all end up with a plastic bin full of cables. Just remember that, if you are connecting, disconnecting and reconnecting regularly, you also need to rotate new cables in on a regular basis to avoid potential problems with data loss or corruption.
One key factor with all of these USB standards is that, as they've evolved, data speeds have gone up with each succeeding generation. It's important to make sure, especially with USB cables, that the cable is built to the data spec you need. USB 1.0 cables, for example, only supported a maximum of 1.5 megabits per second (Mbps), which is barely enough for a single stereo signal at CD resolution (44.1kHz/16-bit). USB-C (or USB 3.1 SuperSpeed to be more accurate) supports up to 10 gigabits per second (Gbps), which is enough for over 3,000 simultaneous audio tracks at that 44.1/16 audio spec. So, make sure you've got a cable that can handle your data.
While we're talking bandwidth, if you need substantial speed, plus the ability to daisy-chain multiple interfaces, Thunderbolt 3 and 4 rule the roost, with up to 40 Gbps data speeds and supporting up to seven daisy-chained devices.
MIDI
This is the other connection you need for modern music making that's not really audio. MIDI is essentially just a communications protocol that sends instructions from one device to another. Using five-pin DIN (which stands for Deutsches Institut für Normung, in case you ever wondered) connectors, these cables tie together keyboard controllers, synthesizers, effects units and pretty much anything else that needs to receive program change or control information in the modern music setup. MIDI cables frequently come with only three of the five pins connected, but, increasingly, those extra pins are being used for phantom power, and some devices even support seven-pin DIN connectors for special applications. Some newer devices, where space is limited, are moving to a simple 3.5 mm TRS connector. A MIDI cable designed for bidirectional communication looks like this:
Pictured: Livewire Essential Dual MIDI Cable
Adapting and Converting
Sometimes, you need to connect two devices and discover that they don't use the same connectors. Whether it's getting those studio headphones with the 1/4" stereo TRS plug connected to your audio interface's 3.5 mm jack, or splitting a stereo jack out to a pair of mono plugs, there's probably an adapter that can do that for you.
Varieties of Adapters and Converters
Once you've been involved in playing and recording music for a while, you'll discover the need to keep a toolkit of various types of adapters to make sure that you can get your signal to wherever it needs to be. These should never be considered a permanent solution to a problem, but sometimes you just have to make do on the spot. Here are basic categories that you'll probably want to have on hand:
Y-Cables and Splitters
These are used to convert one signal into two, two signals into one, or send one signal to two different places. One of the most common is a stereo TRS connector on one end (which could be either male or female) and a pair of mono TS connectors (again, either male or female) on the other. Handy when your keyboard has a combined stereo out that you need to get into a pair of mono inputs on the mixing board (or vice versa). There are almost as many different versions of this cable as there are connector types, to go from stereo 1/4", 3.5 mm, or 2.5 mm male or female to a pair of RCA/Phono, or any other mono connector. There are also Y-cables that simply do a passive send of the incoming signal, so you can send the original signal to two places at the same time. Bear in mind that this application will generally drop your original signal by 3dB or so. For this application, you'd be better off with a D.I. (direct injection) box.
Headphone Adapters
We already touched on these, but they are essential. A lot of older gear has only 1/4" TRS headphone outs, and a lot of newer headphones come with 3.5 mm plugs, so you'll need adapters to step up the size of the headphone plug. Conversely, a lot of newer equipment comes with 3.5 mm headphone jacks, while older headphones and a lot of newer, studio-quality phones have 1/4" TRS plugs, so you'll also need adapters that go that way as well. Plus, both sizes have a tendency to get lost, since neither one is very large, so it's always a good idea to have spares. We keep our stash actually plugged into the multi-output headphone amps in the studio.
Connector Adapters
Sometimes you need to plug a 1/4" plug into a piece of gear that only has XLR connectors. Sometimes you need to plug a mic cable into a guitar amp. So, you always want to have adapters that can make that change. You probably also want a couple of adapters with internal transformers that can change that low-impedance balanced mic cable to a higher-impedance, unbalanced 1/4" mono. As with all adapters, these connectors are available with all the various gender combinations, so you can make that conversion pretty much anywhere along the signal chain. A quick note here that the increased presence of Neutrik combo jacks—that will accept both male XLR and 1/4" plugs—have made a fair amount of this particular type of conversion unnecessary. We've wired up many rack panels with combo jacks for this exact reason.
D.I. Boxes
When you think about it, a D.I. box is really just a very versatile type of adapter. Mono, stereo, active, passive—there are a huge number of D.I. boxes available, and, while there's not enough room to dive into them in depth here, we will say that having one each of basic stereo and mono passive D.I. boxes in your toolkit should be considered part of the essentials.
A Quick Caveat
Before we leave the subject of adapters, we would like to mention that, every time you stick an adapter inline, you're increasing the potential attenuating of your signal level, and of various types of noise and interference getting introduced into your signal. So, barring absolute emergencies, don't stack multiple adapters to get from one connector type to another. If you find that you're always having to use a certain adapter, find or make a cable that does that change without having to stick an adapter inline.
Final Cable Tips
While that should cover most everything you need to start learning about cables and connectors, there are a few other thoughts we'd like to leave you with.
Keeping It Clean
Nobody likes grungy cables. From the mic cables covered with little bits of duct tape adhesive (seriously, use gaffer's tape like PERMACEL 2in X 50 Yard Gaffer Tape instead—it doesn't leave that sticky residue) and whatever that spilled liquid on the stage from the gig was, to the cables that have been hanging in your studio for months, take a microfiber cloth and wipe 'em down as you're wrapping 'em up. They'll be much nicer to handle, and your hands will be much cleaner at the end of it all.
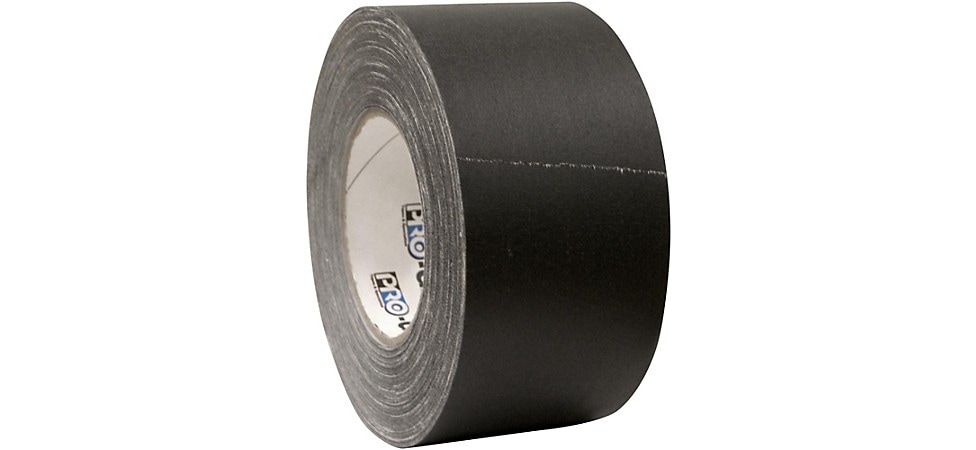
Pictured: PERMACEL Gaffer Tape
How to Properly Wrap Your Cables
We've talked about this before: Properly wrapping cables is one of the core skills of any working pro musician, sound tech or recording engineer. In most recording schools, it's the very first skill you're taught, and we've heard studio owners say that they won't hire anybody who can't do it right. We wrote up a comprehensive, step-by-step guide to the proper, pro-approved technique in our article on controlling noise in your signal path, so we're just providing a handy link to that here. While you're over there, you might even want to check out the whole article before bouncing back here.
The Value of a Cable Tester
One sad fact of life is that cables go bad. They can't help it. Wire that's constantly flexed will fatigue and eventually break. While one or two of the strands of wire in a cable breaking won't affect your sound, enough will break over time that they cable starts to get noisy, loses high-frequency response and, at some point, quits. Treating your cables properly—like wrapping them well and keeping them clean—will help extend their life, but you really need to have a cable tester on hand, like the Livewire Cable Tester. It can test almost every type of cable, and let you know where (or at least in which conductor) any problems might be. Pro tip: Stand up and shake the cable while you're testing it. This can reveal breaks in a conductor that a more passive test might not show. If you see one of the LEDs go from green to red, or go blank when you're testing, get methodical: Flex the cable in 6" sections to try and isolate where the problem might be located. Sometimes you can solve the problem by turning a long cable into a shorter cable. This leads us to our next tip.
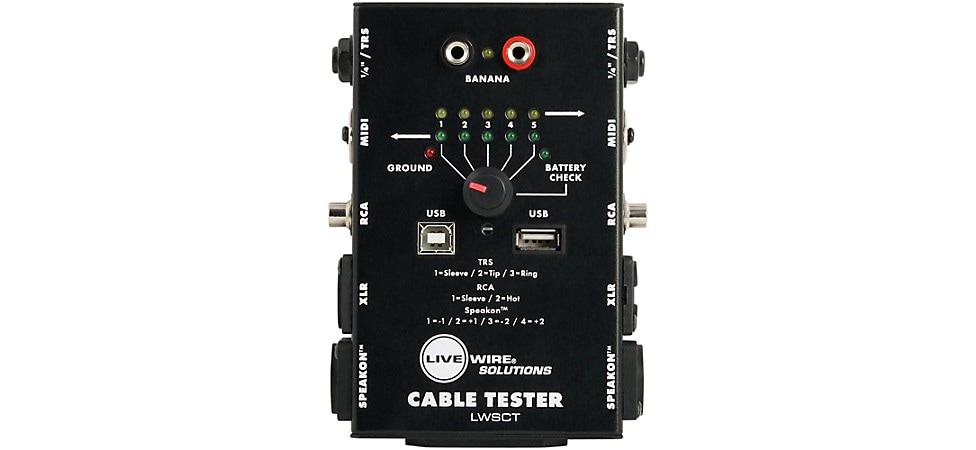
Pictured: Livewire Cable Tester
Know How to Solder
One skill that can turn a potential disaster into a triumph is knowing how to solder. Get even reasonably good at this, and you can fix problems, potentially save a gig where the spare cable box got left at the rehearsal space, or even make your own custom-length cables and adapters. We don't have the time or space here to provide a tutorial, but, hey, that's what the internet is for, right? There are a lot of good electronics hobbyist websites out there that have excellent tutorials that will get you started. You don't have to get good enough at it to build a computer at home in your spare time, but the ability to construct and repair cables will make you a valuable addition to any musicical organization.
Kits and Snakes
If you want custom cables, but don't necessarily want to learn how to solder, check out some of the cable kits out there, like the D'Addario Planet Waves Cable Station Custom Instrument Cable Kit or the Lava Piston Solder-Free Mini Ultramafic Right Angle Cable Kit.
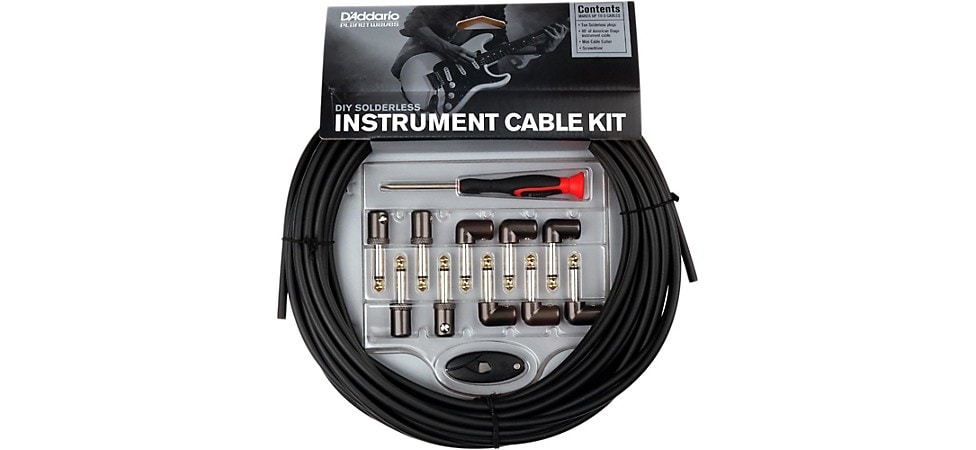
Pictured: D'Addario Planet Waves Cable Station Custom Instrument Cable Kit
For PA and studio use, you'll probably also want to look into audio snakes and stage boxes, to help keep everything neat, organized and quicker to set up and tear down. From studio connectors like the Livewire Essential 8-Channel Snake TRS to TRS, to full-blown stage boxes like the Livewire Advantage 24x4-Snake with XLR Returns, there are a huge range of multi-conductor solutions to help keep your cables wrangled.
Completing the Circuit
We're now at the point where you should be able to look over at the tangle in the corner and face it without fear. Untangle, label, sort and catalog so you know what cables you've got, what cables you need and what cables just don't make sense holding onto (like that giant box that seems to live in everybody’s closet of USB 2 A to B cables that were giveaways with every product 20 years ago). Keeping your signal clean and noise to a minimum is the goal here. If you've got questions about any of this, or are looking for some advice, feel free to drop into your local Guitar Center or give our Call Center a ring. You'll most likely find a fellow musician who's been there and has an answer to your problem.