


StudioMonitorsMixing
Pro Gear Advisers
•866-498-7882
Guitars
Guitars
Amps & Effects
Amps & Effects
Used & Vintage
Keyboards & MIDI
Keyboards & MIDI
Drums
Drums
DJ Equipment
DJ Equipment
Basses
Basses
Recording
Recording
Live Sound
Live Sound
Accessories
Accessories
Mics & Wireless
Mics & Wireless
Music Software
Music Software
Lighting
Lighting
- Popular Brands
Band & Orchestra
Band & Orchestra
Platinum Gear
Deals
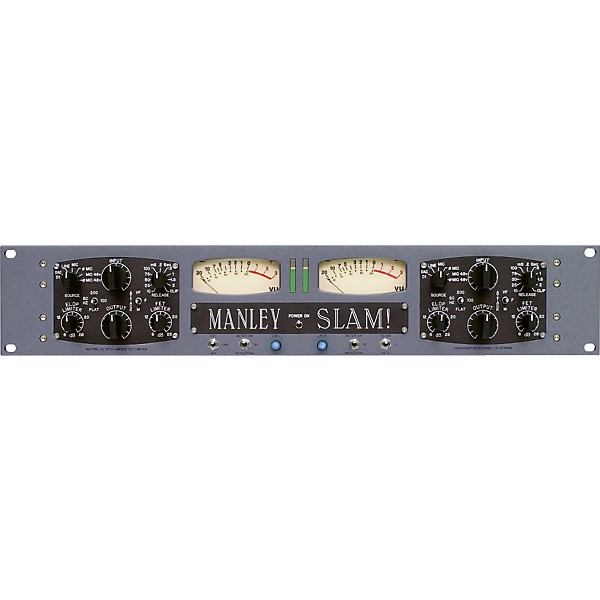
Manley SLAM! 2-Channel Tube Limiter - Mastering Version
$10,499.00
$219/mo.‡ with 48 months financing* + $524 back in Rewards** Limited time Learn More
Protect your gearLearn more
Cover drops, spills or cracks with Pro Coverage
Need Help?

Description
The Manley Mastering SLAM! incorporates detented and logable 1/2dB steps built with 1% metal film resistors on sealed gold-contact Grayhill switches.
• The Mastering SLAM! has no mic preamps or instrument inputs. Instead the tube sections are paralleled for low noise and distortion
• All pots are replaced with rotary switches for detented resettability and easier calibration
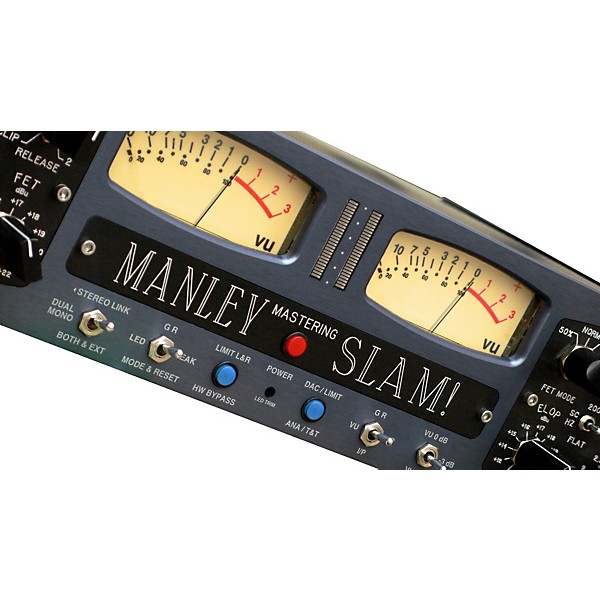
• The mastering version has a true hard-wire bypass function, which is not possible on the regular version with mic preamps, etc. What was the left bypass becomes the full bypass (in stereo and hardwired). No separate L & R bypass buttons
• The right BYPASS button becomes either the DAC select if the Digital Converter Option is installed—or—Limiter Bypass (tubes & transformers still active)
• The SLAM! has a dedicated unbalanced transformerless inputs on the mastering version. What was the Phantom Por switch on the back now selects XLR or 1/4" inputs
• The ELOP limiter now has 5 ratios, which may put it into the compressor/limiter category. The low ratios may be better suited for complex mixes
• The FET limiter has 5 modes (these last two features replace the INPUT selector)
About item 6: The ELOP can be selected for 10:1, 5:1, 3:1, 2:1 and an 'AUTO HF' mode where high frequencies get a higher ratio and low frequencies get a low ratio. This mode is the most gentle. As with most compressors one might need to lower the threshold as one lowers the ratio, if keeping a similar depth of gain reduction is wanted. The threshold markings are based on the 10:1 ratio and a setting of +18 is intended to help reduce DFS overs with a converter with 14dB of headroom over +4 dBm. Many mastering converters are set for 14 dB of headroom and the +18 setting would be a good starting point. Of course, being an Opto-based limiter, it cannot be ultrafast and some peaks will probably get through and it generally will have the typical (puffy) sound of an opto (because of its inherent time constants). It should be pointed out that much of that character is reduced when used in conjunction with the FET limiter. The FET usually catches some of the overshoots and time/gain behavior of the Vactrol, and that can reduce the familiar Optical sonic signature.
The FET limiter has some subtle enhancements, some of which will not be apparent on all sessions. In particular, the LP LIM function will not be obvious unless the input signals are rather hot and more than a few dB of limiting is taking place. LP LIM is meant for those jobs that require more drastic treatments. If those conditions are met, 1) the NORM setting may be verging on "crunchy" and might seem dulled due to reduced transients, 2) the LP LIM setting can be less crunchy, and seem to have more "presence" because the FET limiter won't be pulling down as much mids and highs as it will lows where most of the energy is. It may also be difficult to compare NORM and LP LIM because the change involves a 3 or 4 second time constant. At normal levels, the two modes will be similar sounding. LP LIM seems to help in extreme cases where loudness is the prime goal. Use the Bypass button to check how much dynamic presence is added.
The 50% setting mixes some raw input with the post limiter signal, which is often difficult in a mastering environment. Because the FET side-chain senses right off the output XLR, one immediate indication is significantly deeper gain reduction shown on the LED ladder, but less apparent limiting to our ears. In some ways, it is like reducing the ratio and threshold, maintaining a similar output level. It may sound a bit more open and may be useful where lower level passages need to be raised without killing all transients. Another benefit is that the raw parallel path flows through less circuitry.
The CLIP setting just introduces a soft clip circuit just below +18 dBv or about a dB shy of where a converter set for +14 of headroom might hit DFS clipping. This could allow one more safety valve with a bit of room for the digital filters to behave nicely. One may follow that process with a digital limiter to lift the level a bit closer to DFS if desired. Read more below about the CLIP settings.
You may notice that the Manley SLAM! ATTACK switch simulates some of the audible action associated with attack controls on compressors but still tends to grab most of the fast peaks. In other words, you get some punch with slower attacks. Like other attack controls you may have to adjust the threshold down at slower settings to maintain some clip protection, but may notice that you don't have to adjust the threshold as much as one might expect with a conventional attack control. This is because there is a very fast limiter still hitting transients that are near the threshold of identifying.
The ELOP side-chain filter has some level compensation built in so that chopping off the lows, doesn't cause a huge change in thresholds. There may be some adjustment required depending on the spectral balance of the music though. With bright mixes the 200Hz may actually cause deeper limiting, plus there is a 3dB peak above 4K to help smooth excessive sibilance, though Manley doesn't refer to it as a de-esser.
The hard-wire bypass function is not quite as trivial as might be expected. It is a bit more complicated because of 2 input jacks and the 2 different outputs, plus all the metering. Selection of either the XLR balanced (transformer) input or 1/4" unbalanced (op-amp) is done with a "pull to toggle" switch on the back panel. Generally either output can be used. FET side-chain and OP metering make it so that the SLAM! can be used in a wild way with other processors (like a Massive Passive) in a complex chain. Like many of Manley's processors, using the 1/4" unbalanced output bypasses the final transformer and may be a little cleaner or open sounding compared to the transformer output, which may be a little warmer and richer or evocative of some vintage gear. Might be worth checking out each input and output while you learn the signal processor.
Additional points inspired by some of the early comments from SLAM! users
The Manley Mastering SLAM! is designed primarily as an old-school textbook limiter, and as such, the Output Level knob is not after the final FET limiter. The idea is to set the peak-stop threshold and adjust the incoming level, which is why the level controls are larger. More fun is to be had adjusting the Input and Output Level controls than the Thresholds, which can often just be thought of as "set and forget" especially if the FET Attack time tends to live in one setting. The Output level is not a "gain make-up" control typical of a compressor but consider it as another Input level before the FET and after the ELOP.
Some of the skills or habits Manley has with soft compressors, might be less useful with a limiter. For example, just setting it by ear, with similar input/output levels and an acceptable number of dBs of gain reduction or approaching it as an effect might not get the best results. The approach of trying to achieve a brick wall level and then taking how the dynamics processor is driven (those Input and Output knobs) usually seems to work best. Put another way, limiters or limiting is not often a great effect in itself, but the increased volume when it is used reasonably can be. So, it is about loudness rather than a cool pumping action, or pleasant warmth. The Manley Mastering SLAM! can do some of that, but was designed to be pretty clean for a tubed unit, and hot aggressive colors can be dialed in with the FET limiter.
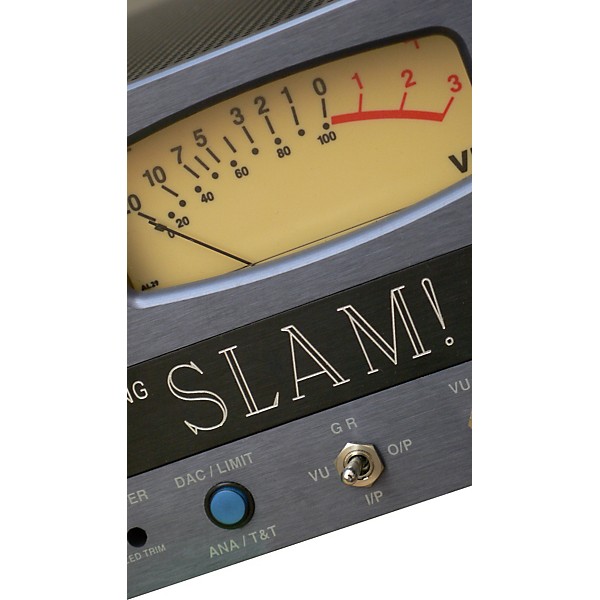
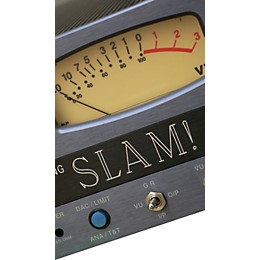
The LED Gain reduction display is 1dB per segment. have seen numerous people at trade shows dial up 15-30dB of gain reduction presumably to see a good number of LEDs flashing. It is still a limiter and should be treated with some respect of the damage a powerful limiter in the wrong hands can do. In other words, it can be particularly vicious. The worst-case scenario is bass-heavy mixes, fast attack and releases, and deep limiting, where some GR modulation can happen. Though much has been done to allow those very fast releases, which maximize loudness, it does pay to be aware that distortions and edginess might be a side effect. Sometimes the best answer is exactly what many mastering engineers do daily, which is use 2 or 3 compressor/limiters each doing a few dB rather than one doing 10dB. The LED meters can be very useful in comparing peak levels, especially when used with the Bypass button. Part of the secret to getting the most out of the Manley SLAM!, is to learn the LED meter modes. Everybody has a favorite display mode, but they all are rather useful and you may find yourself changing modes more than expected. Of course, some rely too much on the meters and forget to listen and assume that particular operating levels are important. There is a healthy range of signal levels that are easily accommodated. Manley suggests using less limiting for the first few weeks until you are reasonably familiar with the stereo limiter and mic preamp unit. There is a learning curve and no real tricks or settings that seem to be common. Every mix may be different.
Lastly, it is not in any way like the Variable Mu and was never intended to be. Each has its own purpose and special "unique talent." The Manley SLAM! may be easier to describe as a damn-fast transient killing secret weapon, or a tubed, analog L-2 with amazing converters, or maybe just a serious "go-louder box."
• The Mastering SLAM! has no mic preamps or instrument inputs. Instead the tube sections are paralleled for low noise and distortion
• All pots are replaced with rotary switches for detented resettability and easier calibration
• The mastering version has a true hard-wire bypass function, which is not possible on the regular version with mic preamps, etc. What was the left bypass becomes the full bypass (in stereo and hardwired). No separate L & R bypass buttons
• The right BYPASS button becomes either the DAC select if the Digital Converter Option is installed—or—Limiter Bypass (tubes & transformers still active)
• The SLAM! has a dedicated unbalanced transformerless inputs on the mastering version. What was the Phantom Por switch on the back now selects XLR or 1/4" inputs
• The ELOP limiter now has 5 ratios, which may put it into the compressor/limiter category. The low ratios may be better suited for complex mixes
• The FET limiter has 5 modes (these last two features replace the INPUT selector)
About item 6: The ELOP can be selected for 10:1, 5:1, 3:1, 2:1 and an 'AUTO HF' mode where high frequencies get a higher ratio and low frequencies get a low ratio. This mode is the most gentle. As with most compressors one might need to lower the threshold as one lowers the ratio, if keeping a similar depth of gain reduction is wanted. The threshold markings are based on the 10:1 ratio and a setting of +18 is intended to help reduce DFS overs with a converter with 14dB of headroom over +4 dBm. Many mastering converters are set for 14 dB of headroom and the +18 setting would be a good starting point. Of course, being an Opto-based limiter, it cannot be ultrafast and some peaks will probably get through and it generally will have the typical (puffy) sound of an opto (because of its inherent time constants). It should be pointed out that much of that character is reduced when used in conjunction with the FET limiter. The FET usually catches some of the overshoots and time/gain behavior of the Vactrol, and that can reduce the familiar Optical sonic signature.
The FET limiter has some subtle enhancements, some of which will not be apparent on all sessions. In particular, the LP LIM function will not be obvious unless the input signals are rather hot and more than a few dB of limiting is taking place. LP LIM is meant for those jobs that require more drastic treatments. If those conditions are met, 1) the NORM setting may be verging on "crunchy" and might seem dulled due to reduced transients, 2) the LP LIM setting can be less crunchy, and seem to have more "presence" because the FET limiter won't be pulling down as much mids and highs as it will lows where most of the energy is. It may also be difficult to compare NORM and LP LIM because the change involves a 3 or 4 second time constant. At normal levels, the two modes will be similar sounding. LP LIM seems to help in extreme cases where loudness is the prime goal. Use the Bypass button to check how much dynamic presence is added.
The 50% setting mixes some raw input with the post limiter signal, which is often difficult in a mastering environment. Because the FET side-chain senses right off the output XLR, one immediate indication is significantly deeper gain reduction shown on the LED ladder, but less apparent limiting to our ears. In some ways, it is like reducing the ratio and threshold, maintaining a similar output level. It may sound a bit more open and may be useful where lower level passages need to be raised without killing all transients. Another benefit is that the raw parallel path flows through less circuitry.
The CLIP setting just introduces a soft clip circuit just below +18 dBv or about a dB shy of where a converter set for +14 of headroom might hit DFS clipping. This could allow one more safety valve with a bit of room for the digital filters to behave nicely. One may follow that process with a digital limiter to lift the level a bit closer to DFS if desired. Read more below about the CLIP settings.
You may notice that the Manley SLAM! ATTACK switch simulates some of the audible action associated with attack controls on compressors but still tends to grab most of the fast peaks. In other words, you get some punch with slower attacks. Like other attack controls you may have to adjust the threshold down at slower settings to maintain some clip protection, but may notice that you don't have to adjust the threshold as much as one might expect with a conventional attack control. This is because there is a very fast limiter still hitting transients that are near the threshold of identifying.
The ELOP side-chain filter has some level compensation built in so that chopping off the lows, doesn't cause a huge change in thresholds. There may be some adjustment required depending on the spectral balance of the music though. With bright mixes the 200Hz may actually cause deeper limiting, plus there is a 3dB peak above 4K to help smooth excessive sibilance, though Manley doesn't refer to it as a de-esser.
The hard-wire bypass function is not quite as trivial as might be expected. It is a bit more complicated because of 2 input jacks and the 2 different outputs, plus all the metering. Selection of either the XLR balanced (transformer) input or 1/4" unbalanced (op-amp) is done with a "pull to toggle" switch on the back panel. Generally either output can be used. FET side-chain and OP metering make it so that the SLAM! can be used in a wild way with other processors (like a Massive Passive) in a complex chain. Like many of Manley's processors, using the 1/4" unbalanced output bypasses the final transformer and may be a little cleaner or open sounding compared to the transformer output, which may be a little warmer and richer or evocative of some vintage gear. Might be worth checking out each input and output while you learn the signal processor.
Additional points inspired by some of the early comments from SLAM! users
The Manley Mastering SLAM! is designed primarily as an old-school textbook limiter, and as such, the Output Level knob is not after the final FET limiter. The idea is to set the peak-stop threshold and adjust the incoming level, which is why the level controls are larger. More fun is to be had adjusting the Input and Output Level controls than the Thresholds, which can often just be thought of as "set and forget" especially if the FET Attack time tends to live in one setting. The Output level is not a "gain make-up" control typical of a compressor but consider it as another Input level before the FET and after the ELOP.
Some of the skills or habits Manley has with soft compressors, might be less useful with a limiter. For example, just setting it by ear, with similar input/output levels and an acceptable number of dBs of gain reduction or approaching it as an effect might not get the best results. The approach of trying to achieve a brick wall level and then taking how the dynamics processor is driven (those Input and Output knobs) usually seems to work best. Put another way, limiters or limiting is not often a great effect in itself, but the increased volume when it is used reasonably can be. So, it is about loudness rather than a cool pumping action, or pleasant warmth. The Manley Mastering SLAM! can do some of that, but was designed to be pretty clean for a tubed unit, and hot aggressive colors can be dialed in with the FET limiter.
The LED Gain reduction display is 1dB per segment. have seen numerous people at trade shows dial up 15-30dB of gain reduction presumably to see a good number of LEDs flashing. It is still a limiter and should be treated with some respect of the damage a powerful limiter in the wrong hands can do. In other words, it can be particularly vicious. The worst-case scenario is bass-heavy mixes, fast attack and releases, and deep limiting, where some GR modulation can happen. Though much has been done to allow those very fast releases, which maximize loudness, it does pay to be aware that distortions and edginess might be a side effect. Sometimes the best answer is exactly what many mastering engineers do daily, which is use 2 or 3 compressor/limiters each doing a few dB rather than one doing 10dB. The LED meters can be very useful in comparing peak levels, especially when used with the Bypass button. Part of the secret to getting the most out of the Manley SLAM!, is to learn the LED meter modes. Everybody has a favorite display mode, but they all are rather useful and you may find yourself changing modes more than expected. Of course, some rely too much on the meters and forget to listen and assume that particular operating levels are important. There is a healthy range of signal levels that are easily accommodated. Manley suggests using less limiting for the first few weeks until you are reasonably familiar with the stereo limiter and mic preamp unit. There is a learning curve and no real tricks or settings that seem to be common. Every mix may be different.
Lastly, it is not in any way like the Variable Mu and was never intended to be. Each has its own purpose and special "unique talent." The Manley SLAM! may be easier to describe as a damn-fast transient killing secret weapon, or a tubed, analog L-2 with amazing converters, or maybe just a serious "go-louder box."


Features
- Input Tubes: 2 x 12AT7A NOS GE specially selected by Manley Labs for low-noise and stable bias
- Output Tubes: 2 x 6414W NOS USA dual triodes
- I/O: Manley transformer coupled balanced inputs and outputs
- Gain: 20dB max. Limiter Gain
- Input Impedance:
- FET Limiter: Attack: approx. 100S; Release: 10mS to 2 sec; Ratio: better than 20:1
- ELOP Limiter: Attack: approx. 10mS for 6dB GR; Release: 2.5 Sec; Ratio: 10:1
- Frequency Response: 5Hz to 60kHz
- Maximum Output : +32dBm, +30dBm (into 1 kohm load)
- THD+N: <.05% @ 1kHz
- Dynamic Range: 115dB typical
- Output Impedance: 200 ohms
- Por Consumption Slam! Analog:
- .480A (480 milliamps = 480mA) @ 120V = 57.6W
- .240A (240 milliamps = 240mA) @ 240V = 57.6W
- Outboard Por Supply is factory set for 100V, 120V or 220-240VAC operation
- for original destination country's mains voltage
- Operating Mains Voltage changeable with por transformer re-wiring via switch and fuse value change
- Mains Voltage Frequency: 50–60Hz
- Size: 19" x 12" x 3.5" (occupies 2u)
- Shipping weight: 25 lb.
Featured Articles
Reviews
Be the first to review the Product
Q&A
Have a question about this product? Our expert Gear Advisers have the answers.
No results but…
You can be the first to ask a new question.
It may be Answered within 48 hours.
Be the first to know about exclusive offers, tips and more.

866-498-7882 English
877-687-5402 Español