


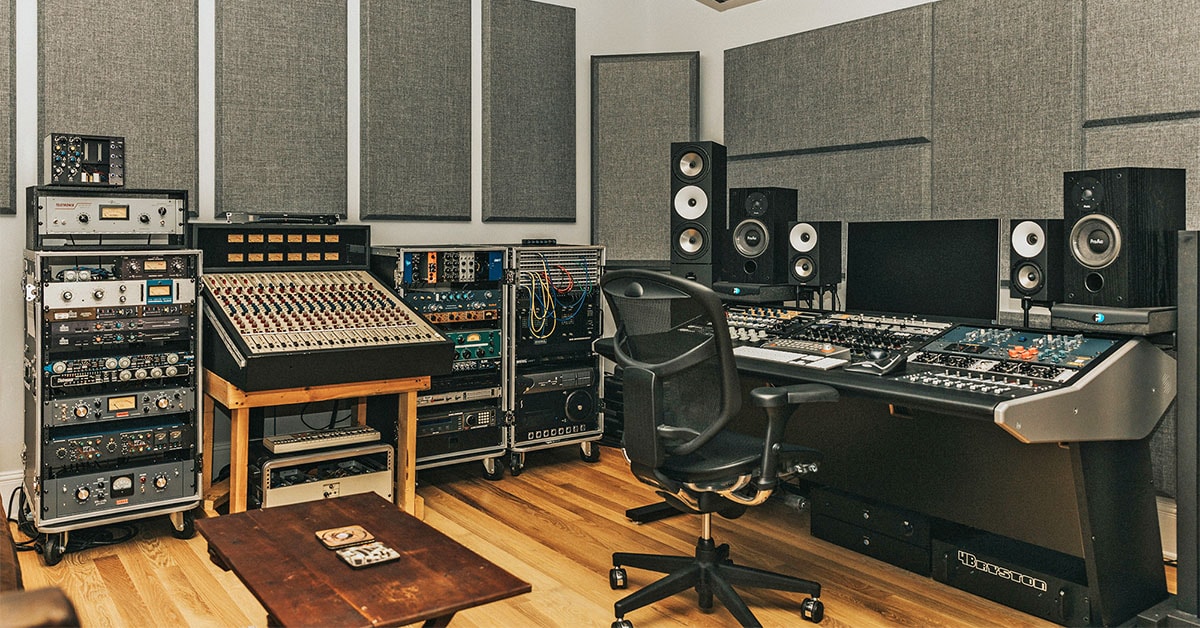
Whether you have a single room project studio or multi-room facility, acoustic design is one of the most important aspects of your music or post production studio, and the Guitar Center Professional team has the expertise to design an effective acoustic treatment plan customized for your needs. The signature sound of your studio is a sum of all its parts, including acoustic treatment. And even if you’ve already invested heavily in the best gear available, your signal chain is only as good as its weakest link—including the sound of the space in which you record, mix and master audio.
Treating your control room can help improve accuracy and translation to other playback systems, while treating your live room can help improve recording quality and provide more control over your sound. In this article, we explain how the solutions engineers at Guitar Center Professional can help you treat your studio for consistent, professional results with our white-glove service.
The Physics of Acoustics
One of the most common acoustic issues in studio spaces involves a phenomenon called room modes. A room mode, sometimes referred to as a standing wave, occurs when the wavelength of a sound is the same as a room dimension. These modes create a series of peaks and nulls throughout the room and can significantly alter your perception of the volume at any frequency that is affected. To make things even more complicated, sound waves can combine within the room, causing additional peaks (if the signals are in phase) or nulls (if the signals are out of phase).
In general, peaks and nulls are the most difficult to treat in small rooms. They’re commonly found near walls and in corners where acoustic energy builds up. This is particularly true with lower frequencies, since they have longer decay times, allowing for additional reflections compared to higher frequencies. Nulls as deep as 30 dB are not uncommon, especially under 300Hz. As you’ll see, one key to a properly treated room is the effective mitigation of these peaks and nulls, most notably in the low end.
The Differences Between Acoustic Treatment and Soundproofing
Before diving into the different types of acoustic treatment, it’s important to make sure that we’re using the proper terminology. “Soundproofing” is mistakenly often used interchangeably with “acoustic treatment”—but they’re not at all the same thing. While the goal of soundproofing is to prevent sound from leaking into or out of a particular area, acoustic treatment is all about how to control and improve the sound within your space.
While this blog post is focused on acoustic treatment for your studio, the same concepts apply to other spaces including concert halls, office spaces and even restaurants. The goal of acoustic treatment, for the purposes of your studio, is to achieve as much clarity and consistency as possible at the mixing position so that you can make well-informed decisions when you produce, track, edit, mix and master.
Absorption vs. Diffusion
As an audio pro, you know that great sound is all about balance. A well-treated room will deliver audio performance you can trust, which makes your job easier and allows you to work faster and with more accuracy and confidence in your sonic decisions. When your room’s frequency response is predictable and balanced, your mixes will translate better to other systems and reduce the need for you to test those mixes outside of your studio. In order to achieve a balanced frequency response you can trust, you’ll likely need to employ a combination of different types of acoustic treatment in your room.
Absorption Panels
Absorption panels trap sound waves and convert their acoustic energy into a very small amount of heat. This effectively eliminates the sound wave and prevents unwanted reflections.
Bass traps are a specialized form of absorption panels designed to control and produce a more accurate low-frequency response. They’re most effective when placed in trihedral corners—where two walls and the ceiling meet, or where two walls and the floor meet. This is especially critical in the corners behind your speakers, where low-frequency energy is at its maximum. Bass traps also provide a great benefit when placed in corners where any two walls intersect.
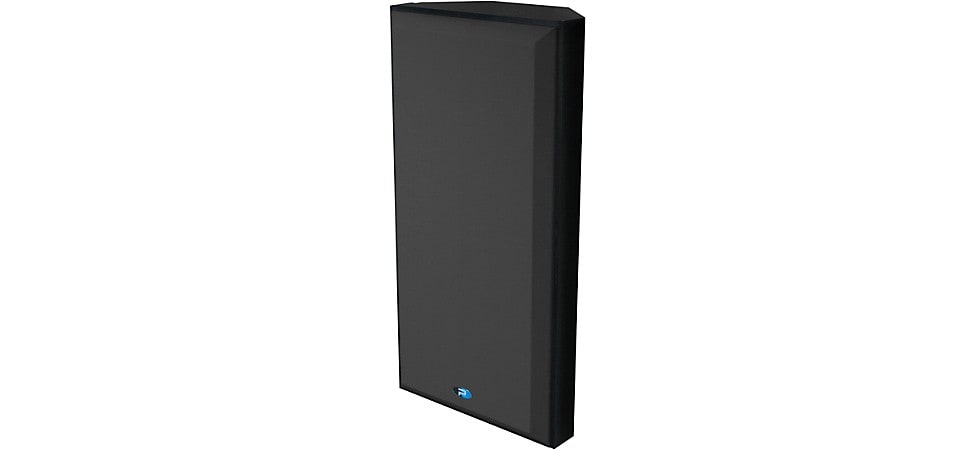
Pictured: Primacoustic Broadway Max Trap 3-way Broadband Absorber and Bass Trap
Aside from specialized bass traps, regular absorption panels are typically made from rigid fiberglass and mineral wool. They’re often employed to target frequencies below 500Hz, but may affect higher frequencies as well. As a general rule, the thicker and more dense the panel, the more effective it will be at controlling lower frequencies. There are even some panels that are specially designed to target specific frequency ranges while leaving others unaffected.
Diffusion Panels
Diffusion panels scatter sound waves evenly in all directions. In this regard, sound waves behave similarly to light. When sound hits a flat surface, it reflects off of that surface at an opposite angle.
Diffusion panels, or diffusers, use the laws of physics to help balance out a room’s frequency response without sucking out all the ambience. In fact, they can make smaller rooms sound larger, yet natural. Diffusion tricks your brain, so it’s not able to localize the reflections from any one point. As a result, it’s much harder to identify the edges of the room. This is the mechanism through which a smaller room is made to feel larger than its physical dimensions.
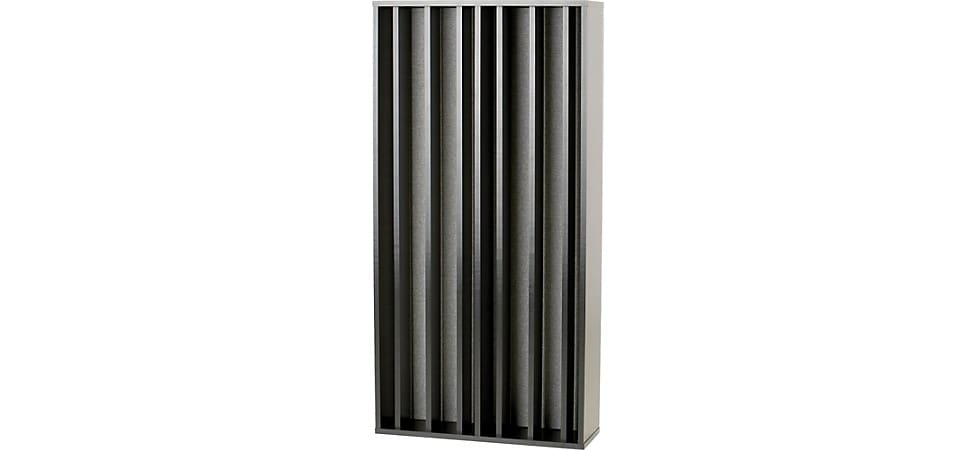
Pictured: Primacoustic FlexiFuser Combination Diffuser
Diffusers typically target frequencies between 500Hz and 1kHz, though some are designed for frequencies as high as 2 to 5kHz. Since diffusers work best when sound is aimed directly at the panel, their optimal placement is generally found at the rear wall and direct reflection points. There are three primary types of diffuser panels: cylindrical, skyline and quadratic residue diffusers (QRDs).
Hybrid Acoustic Panels
Hybrid panels feature a combination of absorption, diffusion and bass trapping functionality. They’re often calibrated for specific frequencies and include traditional fiberglass, mineral wool, scatter plates and resonators.
Proper Monitor Placement
Before you create your acoustic treatment plan, it’s imperative to identify the ideal placement for your monitors and listening position. If you take the time to properly configure your listening position, it will be much easier to appreciate the benefits of acoustic treatment in your studio space. Here are some recommendations to get you started.
- In small rooms, place your monitors close to the front wall.
- To reduce unwanted reflections and ensure a balanced stereo image, your listening position should be located at approximately 3/8 the length of the room and form an equilateral triangle between the speakers and your head.
- Minimize low-frequency buildup by placing your monitors approximately 1/4 of the room’s width away from the closest corner.
- For a flat on-axis frequency response, place your monitors so that your ears are level to the mid-point between the tweeters and woofers of your speakers.
- If you’re using a subwoofer, experiment with different placements around your room. Listen for where the bass sounds balanced—not too loud or too quiet. Avoid placing subwoofers close to walls.
How to Test Your Room
Theoretical measurements are great starting points, but nothing can replace the precision of real-world testing. You can identify the exact location with the flattest frequency response, and as a result, your listening position, by using a reference microphone. It’s important to take your time and test every position multiple times to guarantee you are working with accurate information.
First, purchase a reference microphone, which typically includes room acoustic measurement software. Place the reference microphone in the first position and use the software to generate the test tone and record the frequency response. Repeat this process multiple times, and in multiple locations until you can confidently identify the position with the flattest frequency response. This should be your primary listening position.
Acoustic Treatment Setup
Monitor Stands and Decouplers
Proper monitor isolation is one of the most overlooked aspects of acoustic treatment in project studios and recording studios. If you want to achieve the most accurate frequency response at the listening position, you should implement whatever measures you can to reduce unwanted vibrations and reflections due to your speaker placement. By using professional-grade monitor stands, you can reduce the effect of destructive phenomena, like comb filtering, which is common in project studios when monitors are placed directly on a desk or console.
For even better audio performance, high-quality decouplers are recommended in conjunction with speaker stands to minimize the transfer of vibrations, which can otherwise prevent you from hearing an accurate reproduction of the frequency response in the context of your track.
Contact your local Guitar Center Professional solutions engineer to receive expert advice on which monitor stands and decouplers that are best for your studio.
Bass Traps
As we touched on earlier in this post, it all starts with the low end. If you only treat one aspect of your room, it needs to be with the low-frequency energy in mind. Place bass traps in each of the corners, from floor to ceiling. This is an absolute must, especially for the corners behind your speakers.
Thick panels, like Primacoustic Broadway Broadband Panels are required to effectively eliminate bass frequency energy and reflections. For the best results, we recommend high-density absorption panels, with at least 6 PCF (pounds per cubic foot). If you have specific problematic frequencies due to room modes, there are some solutions available that are designed to target frequency ranges in a way that average acoustic panels simply can’t match.
Eliminate Early Reflections
After treating low-frequency energy, the next most effective thing you can do is to address early reflection points. These are the first points at which sound from your speakers reflect off the walls, ceiling and floor of your room. Left untreated, early reflections will wreak havoc on the clarity of your audio due to comb filtering and flutter echo. These destructive phenomena not only mess with the perceived stereo image produced by your speakers, but also make it nearly impossible to trust the frequency response you hear at your listening position.
How to Easily Identify Early Reflection Points
The most common way to identify the early reflection points in your room is called the “mirror trick.” You’ll need a handheld mirror and a friend to help you out. This is remarkably simple and won’t take more than a few minutes.
- First, sit in the sweet spot (your listening position) and have your friend hold the mirror against one of your walls.
- Next, have your friend move the mirror around the room and mark any points where you see your speakers in the reflection. These are the exact locations of the early reflections and need to be treated with absorption panels to eliminate comb filtering and flutter echo.
- Repeat this process on every wall (front, rear, left, right).
- Do this on the ceiling as well, above the listening position.
Recommended Panels for Early Reflection Treatment
Now that you’ve identified the early reflections, it’s time to select the acoustic absorption panels you need to effectively eliminate this destructive interference. For early reflections like those along the walls (not in corners), you can use thinner panels.
For treatment above the listening position, a dedicated panel or “cloud”, like the Primacoustic Nimbus Acoustic Ceiling Cloud, is highly recommended to eliminate early reflections from the ceiling.
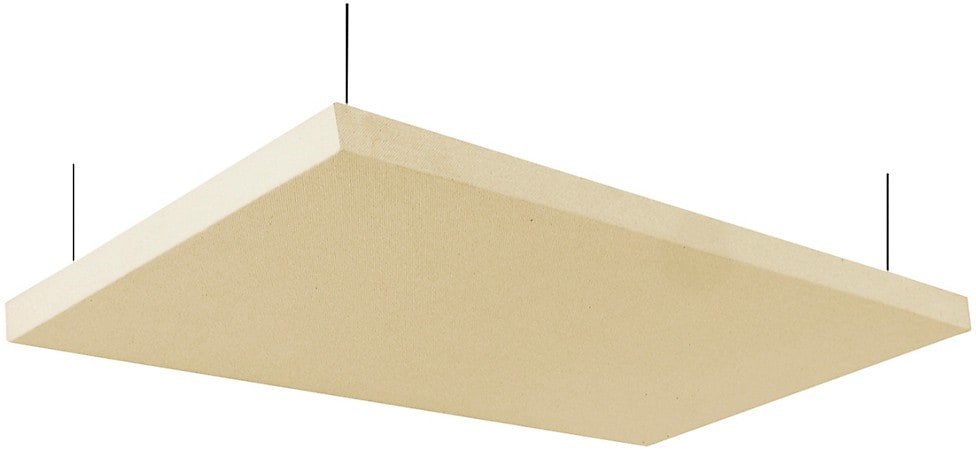
Pictured: Primacoustic Nimbus Acoustic Ceiling Cloud
If you’re looking for an all-in-one package to treat the early reflections in your room, the Primacoustic London 12 Room Kit is perfect for spaces up to 150 square feet. It includes 22 high-performance panels of various sizes and will transform your listening environment with ease.
Additional Acoustic Treatment Options
Live Room Acoustic Treatment
If your studio happens to have a control room and a single live room for recording, you may find that portable gobos are your best option. Gobo panels offer you the flexibility of acting not only as acoustic treatment, but as isolation between live instruments. If you need to track a typical four-piece band live, in-studio, you could use carefully placed gobos to get some isolation on the drums, and get creative with additional panels to achieve acceptable isolation for guitar amps and any other instruments you want to record live.
If you have the luxury of additional rooms, then it becomes even easier to achieve isolation, though your iso booths may benefit from either permanent or portable treatments depending on how they will be most often used.
In other scenarios where you are tracking vocals or an acoustic instrument, you may find that your studio space sounds too big for the vibe you’re after. Gobos and other portable treatments can be the perfect solution to tame your live room just enough to achieve the perfect balance.
For the best advice on the perfect acoustic treatment for your live room and iso booths, contact your local Guitar Center Professional solutions engineer for a free consultation.
Tuning the Ambience
Dead Room Vibes?
Does your room sound too dead after you installed some acoustic treatment? Try hanging some diffuser panels on an open wall. As discussed earlier, strategically placed diffuser panels will help liven up almost any room with some controlled reflections.
Live Room Vibes?
If your room is still feeling too live after you’ve treated the corners and early reflections, try adding a rug or furniture, like a couch or thick drapes. They can be surprisingly effective at absorbing reflections.
Common Limitations of DIY Acoustic Treatments
There are many products that are marketed as inexpensive acoustic treatment solutions. While it’s certainly possible to make high-quality DIY acoustic treatments, there’s a seemingly endless supply of inexpensive and ineffective foam from questionable sources. Solutions like egg cartons and generic inexpensive foam, or makeshift blankets and carpet, generally offer no acoustic benefit below 1kHz and can even be dangerous if they contain highly flammable materials.
If your budget necessitates buying foam instead of absorption panels, we recommend solutions that use reliable, quality materials, like the Auralex 2“ Studiofoam Wedges.
And while room correction software can be an attractive solution on the surface, it can introduce a host of complications, from latency to phase shift, and compatibility issues too. It should only be used as a last resort, and in concert with already installed acoustic treatment.
Acoustic Treatment Recap
We covered a lot of ground in this post, so here’s a short list of steps you can take if you’re ready to level up your room’s acoustic performance.
- First, make sure your speakers are positioned properly, and you’ve identified the ideal listening position in your control room.
- Next, analyze the frequency response of your room using a reference microphone and confirm the ideal spot with the flattest frequency response.
- Then, address all of the corners with bass traps to control the low-frequency energy and reflections.
- Grab a friend and use the “mirror trick” to identify early reflection points and add absorption panels as required. Don’t forget the ceiling!
- Finally, supplement your acoustic treatment with diffusers as needed if the room feels too dead.
Follow these steps and you will be well on your way to an incredible sounding room. Get personalized advice on acoustic treatments for your studio space, including how to find and install the best solutions for you, by contacting our team of studio professionals for a free consultation and white-glove service.